How to manually install WSL2 on a Windows 10 Virtual Machine

Advocate for better developer's productivity and experience
Documenting my learnings and sharing it
I finally, finally get WSL2 to run in a Virtual Machine running on VMWare Player v17.0.0 after hours and hours of trial and error and research and tons and tons of reading. And that's not the best part, the best part is I also managed to get it working in an air-gapped (offline) environment. I'm so glad that I finally get it to work, and also gained some insights into the various technical aspect of virtualization.
I'm quite sure this will work for most, if not all, scenarios. I will be going through the steps by steps guide, as well as the possible error or issues you may encounter along the way, and how to overcome them (See troubleshooting section).
This guide is targeted at an air-gapped environment context where no internet is available within the virtual machine. However, it is also useful for those who want to know how to enable and run nested virtualization within a VM
Context
I am exploring ways to enable virtualization within a virtual machine (VM) which is also sometimes referred to as nested virtualization.
The diagram below shows an overview of what I am trying to achieve.
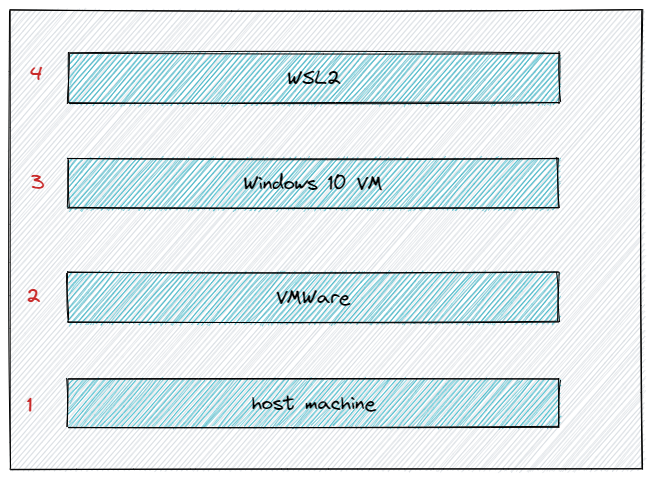
This is the host machine
VMWare Player is installed on the host machine where
I create a Windows 10 virtual machine using VMWare Player
Within the virtual machine, I want to run WSL2 on it
Challenge
So what's exactly the challenge about getting this to work? Well, before I got it to work, it seems like an impossible task, but after I made it work, it seems like just getting the right pieces together which consist mainly on
Enable nested virtualization to work on VMWare Player
- Where the host machine is also running virtualization (e.g Hyper-V)
Manual installation of Linux Kernel Package, WSL2, and Linux Distribution (i.e. Ubuntu)
Most importantly, to get it to work in an air-gapped (offline) environment
Seem easy enough, ain't it? Let's see how we can do it in this article
Setup
In my setup, these are the following Operating Systems and Applications versions used at the time of writing.
Host Machine | Windows 10 x64 Version 22H2 (Build 19045.2251) |
VMWare | VMware® Workstation 17 Player 17.0.0 build-20800274 |
Virtual Machine | Windows 10 x64 Version 22H2 (ISO Image build using Windows Media Tool) |
WSL | WSL2 v1.0.0 |
WSL Kernel | 5.10.16 |
Linux Distribution | Ubuntu 22.04 LTS |
While I used VMWare Player to test it out, this should work for Oracle VM VirtualBox or even Hyper-V as well
For 3rd party hypervisors such as VMWare, or VirtualBox. Please ensure it is at least Version 15.5 and Version 6.0 respectively
For Hyper-V, see this
Preparation
Since this is based on the assumption of installing and running on an air-gapped environment, you will not have access to the internet within the VM, and these are the installers you will need to download first on the host machine (or elsewhere), and later port into the VM.
| Application | Purpose |
| Windows 10 Installation Media | Prepare Windows 10 x64 22H2 ISO image |
| VMware Player | Hypervisor to run a virtual machine |
| WSL | Windows Subsystem for Linux |
| WSL2 Linux Kernel Update Package | Update Linux Kernel to support WSL2 |
| Ubuntu 22.04 LTS Distribution | WSL Linux distributions |
I won't be going through how to create an image or install VMWare Player, as these are not the focus of this article. There are plenty of great articles out there on how to do those.
My assumption is that you already have VMWare Player installed.
Enable Virtualization in BIOS
I think at this current time and age, virtualization would be enabled on your BIOS by default, and you probably need not change anything, especially if you are already running some sort of virtualized work on your host machine such as running Hyper-V, Docker Desktop and so on.
Otherwise, you can follow this excellent guide on how to enable it in your BIOS.
Disable Hypervisor on host machine
This can be said to be the most important step because without disabling the hypervisor on the host machine, VMWare virtual machine cannot be configured to use nested virtualization as the option will be greyed out
Launch terminal with administrator rights
Run
bcdeditand see something along this line
> bcdedit

Windows Boot Loader
-------------------
identifier              {current}
device                  partition=C:
path                    \WINDOWS\system32\winload.efi
description             Windows 10
locale                  en-US
inherit                 {bootloadersettings}
recoverysequence        {61b00ac8-16d1-xxxx-xxxx-xxxxxxxxxxxx}
volumebandid            2
displaymessageoverride  Recovery
recoveryenabled         Yes
isolatedcontext         Yes
allowedinmemorysettings 0x15000075
osdevice                partition=C:
systemroot              \WINDOWS
resumeobject            {61b00ac6-16d1-xxxx-xxxx-xxxxxxxxxxxx}
nx                      OptIn
bootmenupolicy          Standard
hypervisorlaunchtype    Auto
Focus on the last item -
hypervisorlaunchtype- We need to set this to
offby running the following command
- We need to set this to
bcdedit /set hypervisorlaunchtype off
It does not provide any sort of feedback to indicate that the changes is made
After running the command, reboot your machine manually
If you look around enough, there will be various other ways to achieve nested virtualization but in my opinion, this method should be the least intrusive and most easy. Why? Because you only need to run a single command and reboot your host machine and it does (should) not cause any side-effect to your existing virtualization software or tools or configuration.
What this command does is essentially disable the hypervisor (i.e. Hyper-V) from running on the host machine, and allow VMWare to enable nested virtualization
This is how it looks like on my host machine
Everything is still intact
What this means is that you can't use Hyper-V, Docker Desktop or any other virtualization stuff on your host machine while allowing nested virtualization to happen. But it also means that whenever you do not need to use nested virtualization, you can simply run the following command to disable it and you can continue to use virtualization stuff on your host machine.
bcdedit /set hypervisorlaunchtype auto
With that, we are all set to create our VM, install Windows 10 OS, and WSL2
Steps
Creating Virtual Machine
Launch VMWare Player
Click
Create a new Virtual Machine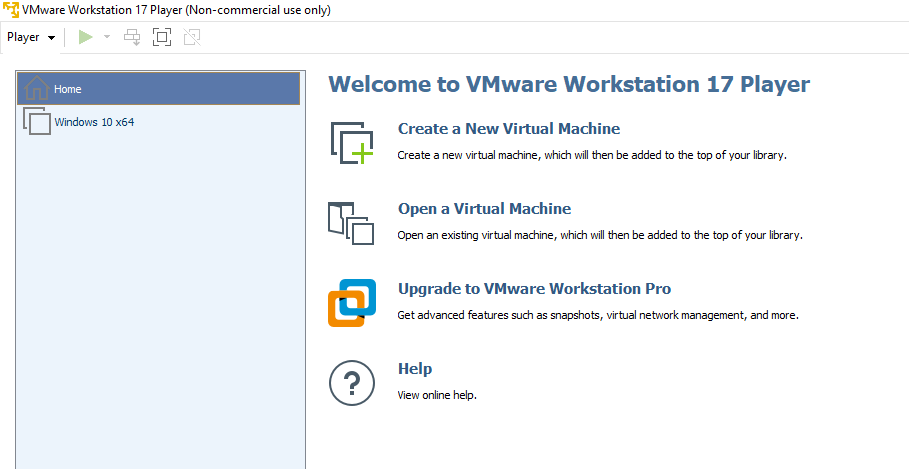
Browse to the
iso fileand clickNext >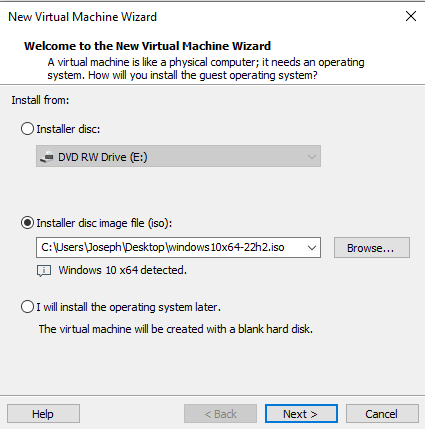
Give your virtual machine a name and click
Next >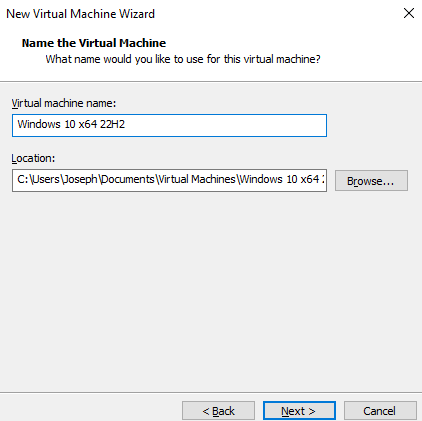
Click
Next >when asked forDisk Capacity. The default is60GBClick on
Customize HardwareMemory: Adjust your memory as you wish, I do recommend at least
4GBProcessors: Check
Virtualize Intel VT-x/EPT or AMD-V/RVIto allow for nested virtualization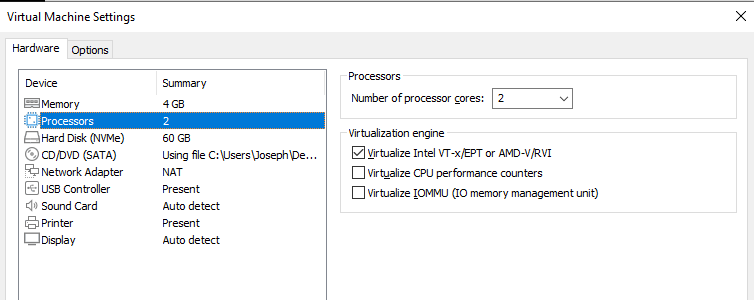
This is the most important step, ensure that this option is checked. If this section is greyed out, ensure you have done the preparation, or go through the troubleshooting guide
Network Adapter: Uncheck
Connect at power onto simulate an offline environment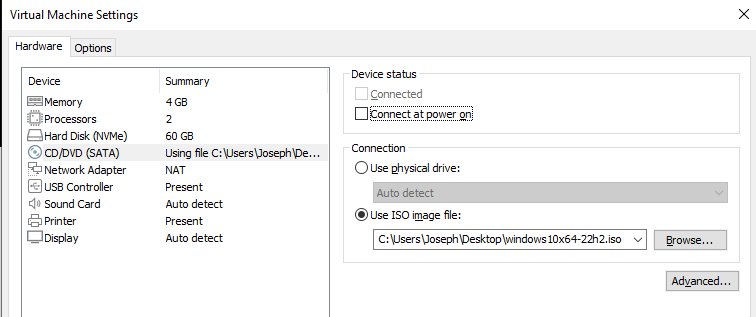
Click
Closeonce doneClick
Finishto start the creation of the virtual machine. It will auto-power on right after the creation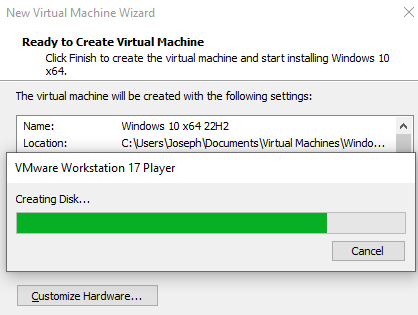
Continue with the installation of Windows 10
Installing Windows 10 OS
I will not go through the step-by-step for this section, only highlight certain parts to take note of during the installation
Select
Windows 10 Prowhen prompted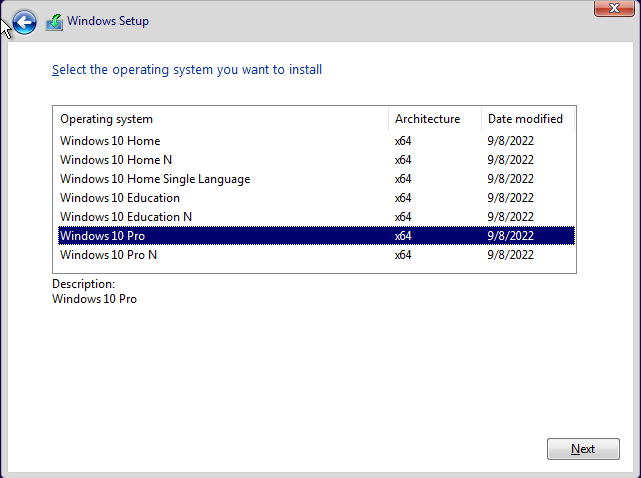
Select
I don't have internet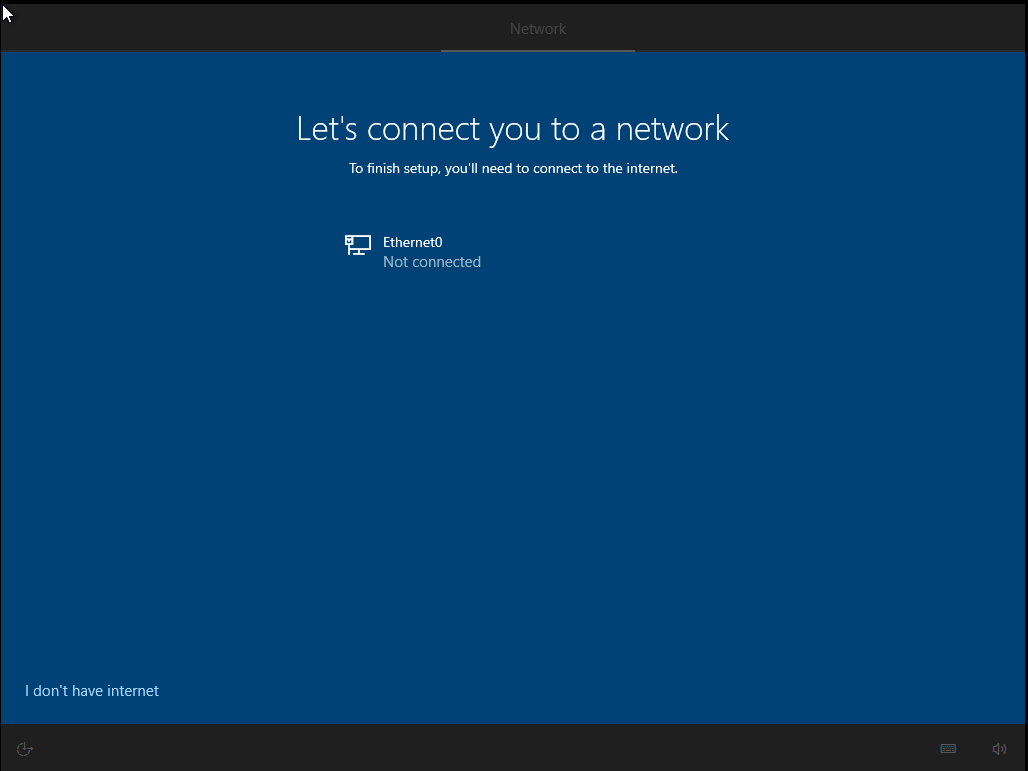
Select
Continue with limited setup
Post OS Installation
There are a couple of things we need to do before the actual installation of WSL2
VMWare Tools
This is not exactly required to run WSL2, but more to improve your experience while managing virtual machine(s) and more seamless interaction
Select
Player > Manage > Install VMWare Tools...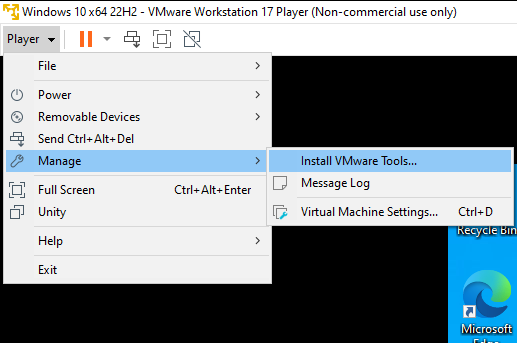
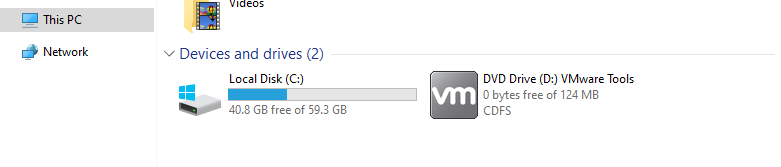
It will then be mounted as a drive within the VM
Double-click to launch it
Follow the screen instruction to install it
- Select
Completesetup type when prompted
- Select
Restart VM after installation is completed
Copy files to VM
Since we are working in offline mode, we have to copy files from the host machine to the VM by simply dragging the files from the host machine directory into the VM directory as shown in the gif below.
You will only require the following files for the rest of the guide
Microsoft.WSL_1.0.0.0_x64_ARM64.msixbundle
Ubuntu2204-221101.AppxBundle
wsl_update_x64.msi
Your filename may differ if you came from the future, as the version number will likely be different
Installing WSL2
Now that we have the required files within the VM, we can now start the actual installation of WSL2.
If you are working on an internet-enabled machine, you can simply run
wsl --installwhich will enable the necessary components, update the kernel, and installUbuntuas the default Linux distribution
Windows Features
First, let's take a look at the current state of the Windows Features inside our VM
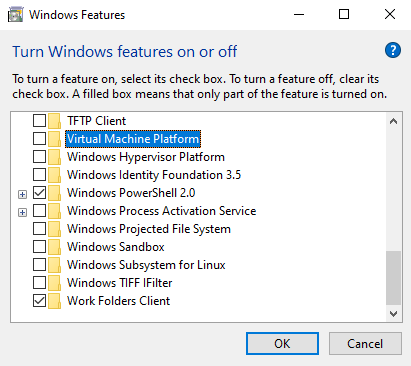
The two key components are now unchecked
Virtual Machine Platform
Windows Subsystem for Linux
WSL is now generally available (GA) in Windows Store since 22 Nov 2022
Enable WSL component
Launch
PowerShellas administratorRun
dism.exe /online /enable-feature /featurename:Microsoft-Windows-Subsystem-Linux /all /norestart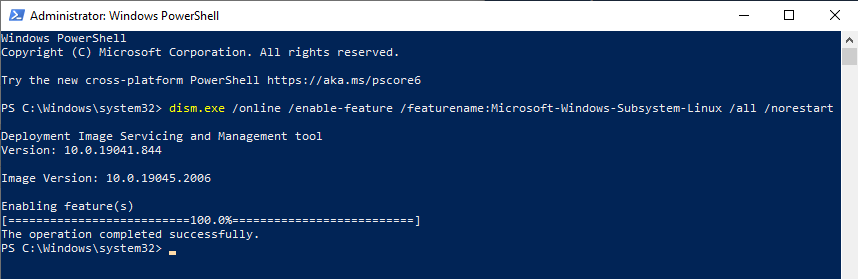
Enable Virtual Machine Platform
Run
dism.exe /online /enable-feature /featurename:VirtualMachinePlatform /all /norestart
Reboot your machine
Install Linux Kernel Package
Navigate to the directory where the files are located at
Double-click on
wsl_update_x64.msiFollow on-screen instruction
After installed, run
wsl --status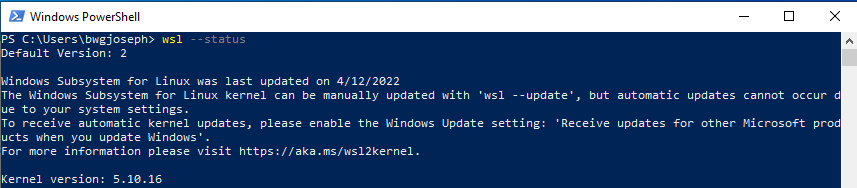
The kernel version at the time of writing is 5.10.16
Install WSL 2
Launch
PowerShellas administratorNavigate to the directory where the files are located at
Run
Add-AppxPackage .\Microsoft.WSL_1.0.0.0_x64_ARM64.msixbundle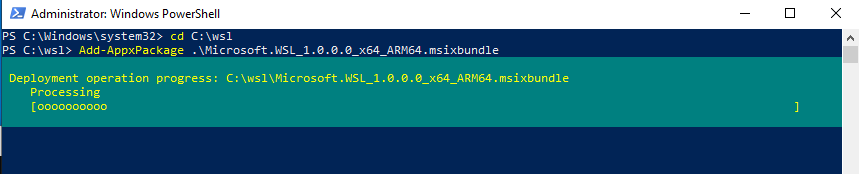
Set default WSL version
- Run
wsl --set-default-version 2
Install Ubuntu 22.04 LTS
[Update 7th Jan 2023]: Please follow the instructions here to extract the necessary files and install Ubuntu, and ignore the steps below
[continue from above]
Run
Add-AppxPackage .\Ubuntu2204-221101.AppxBundle
Once completed, follow the instruction here to gain access to the
WindowsAppdirectory (I'll wait)Once you have gained access and copied the files
Navigate to the directory
Double-click on
ubuntu.exeFollow the on-screen instruction to finish the rest of the setup
While the workaround works, you cannot launch it via the
Start Menubut you can pin it to the taskbar, or create a shortcut on your desktop to launch it
Congratulations! You have completed all the steps necessary to reach the goal we set at the start.
Conclusion
I hope that this article helps someone else who is looking into performing manual installation of WSL2 on a virtual machine in an air-gapped environment and sharing solutions to overcome some of the issues you may face along the way.
Give a thumbs-up if you find this article useful.
Troubleshooting
Virtualized Intel VT-x/EPT is not supported on this platform
I have previously encountered an issue where I disabled all four components of the Windows Features, and I can check Virtualize Intel VT-x/EPT or AMD-V/RVI in VMWare VM Settings but yet it still complains something along this line when the VM is starting
Virtualized Intel VT-x/EPT is not supported on this platform.

Continue without virtualized Intel VT-x/EPT?
The solution is simply going into BIOS and triggering a "reset" of the virtualization setting. All thanks to the following comment buried within a sea of comments and issues all around the internet
Unable to launch Ubuntu post installation
If you run the following command Add-AppxPackage .\Ubuntu2204-221101.AppxBundle to install the Ubuntu distribution but
it did not show any installed distro after running
wsl -l -vPS C:\wsl> wsl -l -v Windows Subsystem for Linux has no installed distributions. Distributions can be installed by visiting the Microsoft Store: https://aka.ms/wslstoreYou cannot launch it via the Start Menu
I hope this will help to solve your issue.
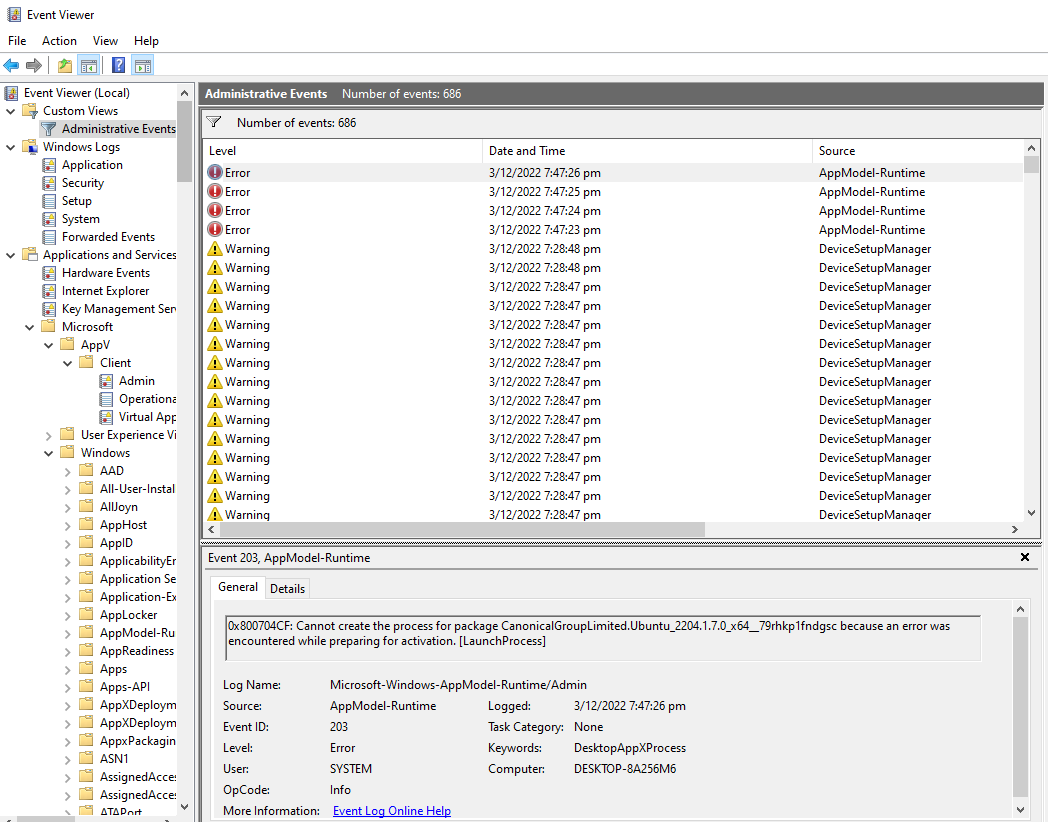
So what happened? I believe this has to do with permission somehow due to manual installation. If we look at the windows event logs, we can find the following error
0x800704CF: Cannot create the process for package CanonicalGroupLimited.Ubuntu_2204.1.7.0_x64__79rhkp1fndgsc because an error was encountered while preparing for activation.
And if you attempt to launch via the installer file, you will encounter the following error
After some google searches, I finally landed on a workaround mentioned here and here which is to copy the ubuntu directory to another location (i.e. C:\)
However, if you attempt to access C:\Program Files\WindowsApp, you will encounter yet another error
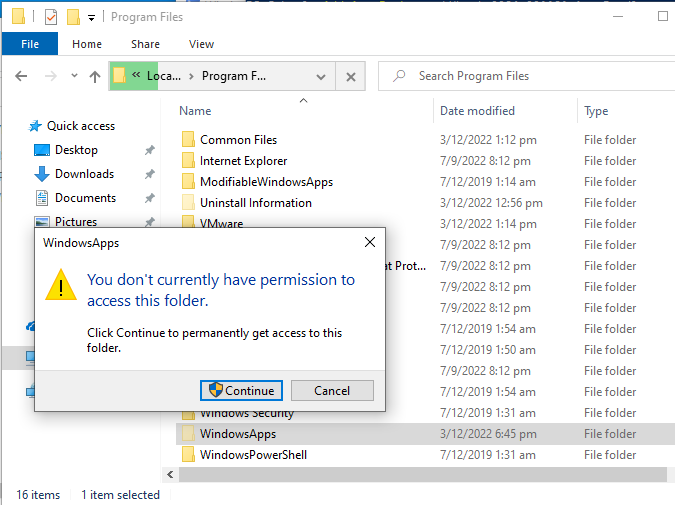
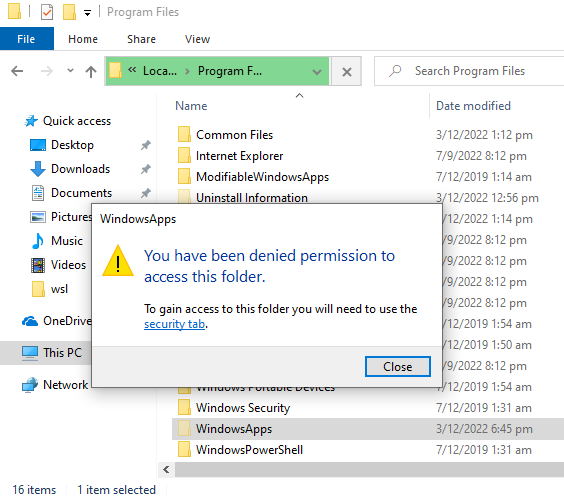
Follow the instruction listed under 1. How to Access WindowsApps via File Explorer should suffice. Once you gain access to the WindowsApp directory, copy CanonicalGroupLimited.Ubuntu_2204.1.7.0_x64__79rhkp1fndgsc directory to C:\ (or any other location of your choice)
Remember to head back to installing-ubuntu-2204-lts if you came from there and continue the rest of the instruction
Missing WSL optional component
If you attempt to launch WSL right after installation, and you may face the following error
This application requires the Windows Subsystem for Linux Optional Component.
The system may need to be restarted so the changes can take effect.
Press any key to continue...

That means exactly what the error message said, where the WSL optional component is not enabled yet. So make sure you follow the instruction listed here to enable the WSL component.
WSL 2 Kernel file is not found
If you ran wsl --status and you get the following message
Default Version: 2

The Windows Subsystem for Linux kernel can be manually updated with 'wsl --update', but automatic updates cannot occur due to your system settings. To receive automatic kernel updates, please enable the Windows Update setting: 'Receive updates for other Microsoft products when you update Windows'. For more information please visit https://aka.ms/wsl2kernel.

The WSL 2 kernel file is not found. To update or restore the kernel please run 'wsl.exe --update'
Double-click on wsl_update_x64.msi to update the kernel and then run wsl --status again and you should see the following now.
Notice the kernel version is now showing as 5.10.16
Default Version: 2

Windows Subsystem for Linux was last updated on 3/12/2022
The Windows Subsystem for Linux kernel can be manually updated with 'wsl --update', but automatic updates cannot occur due to your system settings.
To receive automatic kernel updates, please enable the Windows Update setting: 'Receive updates for other Microsoft products when you update Windows'.
For more information please visit https://aka.ms/wsl2kernel.

Kernel version: 5.10.16