Maven 101 - Basics

Advocate for better developer's productivity and experience
Documenting my learnings and sharing it
Introduction
Maven is used to manage and build any Java-based project. It provides an opinionated way of the project structure, managing dependencies, building projects and deploying the artifacts.
Project Object Model (POM)
POM stands for Project Object Model. This is the core of Maven and it is declared using XML.
Let's take a look at a sample pom.xml.
<?xml version="1.0" encoding="UTF-8"?>
<project xmlns="http://maven.apache.org/POM/4.0.0" xmlns:xsi="http://www.w3.org/2001/XMLSchema-instance"
    xsi:schemaLocation="http://maven.apache.org/POM/4.0.0 https://maven.apache.org/xsd/maven-4.0.0.xsd">
    <!-- Required -->
    <modelVersion>4.0.0</modelVersion>

    <!-- This 3 properties also known as Coordinates -->
    <groupId>com.bwgjoseph</groupId>
    <artifactId>maven-101-basic</artifactId>
    <version>0.0.1-SNAPSHOT</version>

    <!-- Optional -->
    <name>maven-101-basic</name>
    <description>Maven 101 Basics</description>

</project>
It contains the following key components:
- modelVersion
- Coordinates
  - groupId, artifactId, version
- name
- description
pom file always exists at the root of the project directory.
root/
├── .mvn
├── src/
│   ├── main
│   └── test
├── mvnw
├── mvnw.cmd
└── pom.xml
Simple POM
The above is what is normally referred to as the Simple POM.
modelVersion and Coordinates are the two minimum declarations required for a pom file to work. And it inherits all of the Super POM declarations by default.
Super POM
Maven comes with Super POM as the default POM which defines all the default configurations of a project. As mentioned above, every project POM extends Super POM, and thus, inherits all the configuration.
A sample of Super POM can be found here. It contains the following
- modelVersion
- repositories
- pluginRepositories
- build
- reporting
- profile
Effective POM
This is the final actual POM after merging the values with Super POM.
We can see the final or effective POM by running the command below
./mvnw help:effective-pom
The output is pretty long so I will not be attaching the logs here, but if you do run it. You will notice that it is a combination of Super and Simple POM.
This is useful for debugging when you want to know what exactly forms up your POM, especially in a fairly complex project.
Goal and Phase
I believe the best place to understand it is through official Maven Docs. So make sure to run through those. Here, I will add some additional notes that aid me in my understanding.
Lifecycle
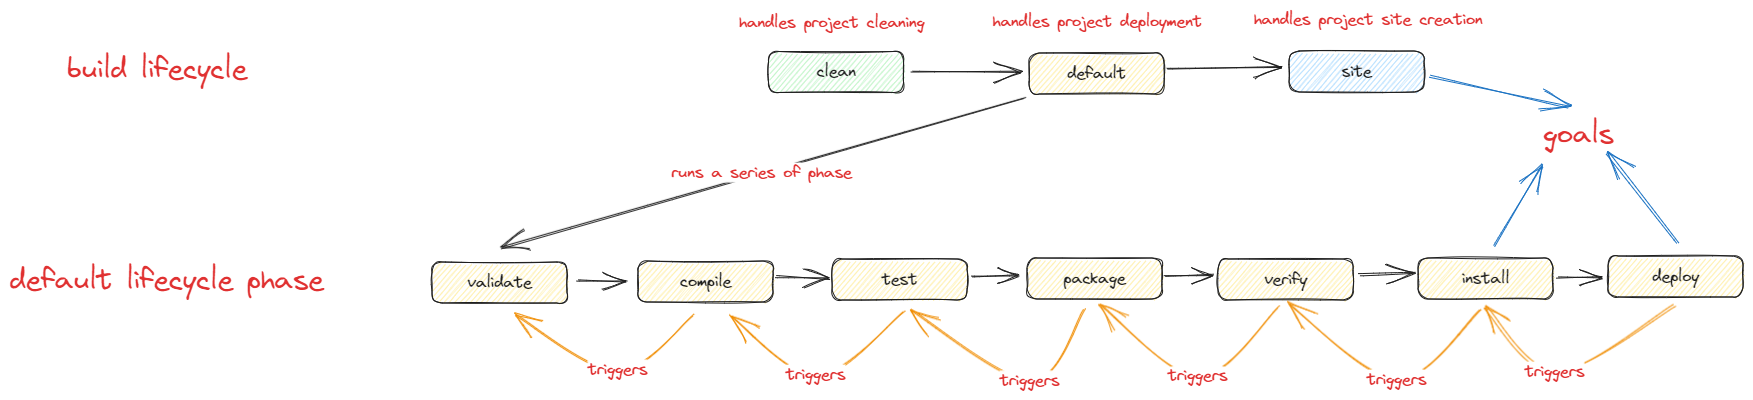
This is a bird's eye view of the Maven Lifecycle. To see the complete lifecycle view, refer to the complete lifecycle.
Phase
At each lifecycle, it comes with a whole set of the phases that it runs. For example, for clean, it has pre-clean, clean and post-clean.
What's important to note is that build lifecycle needs to run on its own, but default lifecycle should run based on what you want to achieve as it will be (and I quote) "executed in the order given up to the point of the one specified".
./mvnw [phase]
For example, if I want to ensure my project can compile, I can either run ./mvnw clean compile or ./mvnw compile.
Running ./mvnw compile will not trigger clean phase unlike running compile which will ensure validate phase is run first.
./mvnw compile

❌ clean
✔ validate > compile
❌ clean > validate > compile

./mvnw clean compile

✔ clean
✔ validate > compile
❌ clean > validate > compile
What happens in each phase
validate: validate the project
compile: compile source code
test: test the compiled source code
package: take the compiled source code and package it into JAR
verify: verify package is valid
install: install the package into the local repository
deploy: deploy the package into the remote repository
Goal
Up to this point, I have only talked about phase. What about goal? It is important to note that for each phase, there will usually be at least one goal (tasks) that is attached which is defined by Maven plugin.
Refer to goal-binding to know each phase is bound by which goal
Remember when I mentioned about phase where running one will automatically invoke the previous phases? If you run a particular goal, it will not invoke any previous phase.
./mvnw [plugin]:[goal]
What it means is that if I run ./mvnw package, it will run the following phase in order
validate > compile > test > package
But if I run ./mvnw jar:jar, it will execute only the jar goal and not anything before that. So if you don't have necessary resources (i.e./target/classes, etc.), it will throw a warning
> ./mvnw jar:jar
[INFO] Scanning for projects...
[INFO]
[INFO] -------------------< com.bwgjoseph:maven-101-basic >--------------------
[INFO] Building maven-101-basic 0.0.1-SNAPSHOT
[INFO]   from pom.xml
[INFO] --------------------------------[ jar ]---------------------------------
[INFO]
[INFO] --- jar:3.3.0:jar (default-cli) @ maven-101-basic ---
[WARNING] JAR will be empty - no content was marked for inclusion!
[INFO] Building jar: Z:\Development\workspace\github\bwgjoseph\tutorials\maven-101-basic\target\maven-101-basic-0.0.1-SNAPSHOT.jar
[INFO] ------------------------------------------------------------------------
[INFO] BUILD SUCCESS
[INFO] ------------------------------------------------------------------------
[INFO] Total time:  1.682 s
[INFO] Finished at: 2023-09-03T16:05:46+08:00
[INFO] ------------------------------------------------------------------------
Plugin
Maven relies on plugin to perform any type of work. Take a look here for the list of plugins provided by Maven.
Each plugin provides at least 1 goal to it and has no upper-bound limit (AFAIK).
To understand what goals are available, it is usually described in the various help plugin docs, and compiler plugin docs.
One could also use the help plugin to list down in the console.
# using groupId with details
./mvnw help:describe -DgroupId="org.apache.maven.plugins" -DartifactId=maven-clean-plugin -Ddetail=true
# using groupId with without details
./mvnw help:describe -DgroupId="org.apache.maven.plugins" -DartifactId=maven-clean-plugin
# using plugin with version and details
./mvnw help:describe -Dplugin="org.apache.maven.plugins:maven-clean-plugin:3.3.1" -Ddetail=true
# using plugin without version and details
./mvnw help:describe -Dplugin="org.apache.maven.plugins:maven-clean-plugin"
Binding plugin goal to phase
If you want to bind a plugin goal to a particular phase, you can do it via the execution tag even if the plugin has already bound to some phase.
Let's use spotless-maven as an example.
<plugin>
  <groupId>com.diffplug.spotless</groupId>
  <artifactId>spotless-maven-plugin</artifactId>
  <version>${spotless.version}</version>
  <configuration>
    <!-- omitted -->
  </configuration>
</plugin>
As mentioned in the docs, a spotless:check is bound to verify the maven phase, and it means that when running ./mvnw verify it will trigger spotless:check goal. If it was not bounded by the plugin, I would have to write something like this
<plugin>
  <groupId>com.diffplug.spotless</groupId>
  <artifactId>spotless-maven-plugin</artifactId>
  <version>${spotless.version}</version>
  <configuration>
    <!-- omitted -->
  </configuration>
  <executions>
    <execution>
      <phase>verify</phase>
      <goals>
        <goal>check</goal>
      </goals>
    </execution>
  </executions>
</plugin>
And if I want to bound to other phases like compile
<plugin>
  <groupId>com.diffplug.spotless</groupId>
  <artifactId>spotless-maven-plugin</artifactId>
  <version>${spotless.version}</version>
  <configuration>
    <!-- omitted -->
  </configuration>
  <executions>
    <execution>
      <id>spotless-compile-check</id>
      <phase>compile</phase>
      <goals>
        <goal>check</goal>
      </goals>
    </execution>
  </executions>
</plugin>
Optionally, I can also give it a unique id which is used to identify (and show) in the console.
> ./mvnw compile
// omitted
[INFO] --- spotless:2.39.0:check (spotless-compile-check) @ maven-101-basic ---
[INFO] ------------------------------------------------------------------------
[INFO] BUILD SUCCESS
[INFO] ------------------------------------------------------------------------
[INFO] Total time:  3.429 s
[INFO] Finished at: 2023-09-03T16:13:55+08:00
[INFO] ------------------------------------------------------------------------
Dependencies
One of the most important parts of using build tools like Maven is to allow it to manage the dependencies of the project. Similar to how other build tools such as npm do it as well.
One would specify the dependencies (and version) the project requires, and Maven will download and manage it according to how you defined it.
Below is an example of adding Lombok dependency on the project.
<dependencies>
    <dependency>
        <groupId>org.projectlombok</groupId>
        <artifactId>lombok</artifactId>
        <version>1.18.28</version>
        <scope>provided</scope>
    </dependency>
</dependencies>
There is a lot more to this such as
classifier
optional
version requirement
exclusion
But I will not be covering those. Refer to here if you are interested to know more. In most cases, all those are not required (including scope), only groupId, artifactId, and version are required.
Model Interpolation
Maven provides a way to replace/define value via ${...} syntax. Some of the more common ones are
${project.version}
${project.basedir}
${user.home}
${java.home}
${env.PATH}
This allows us to define it like this
<groupId>com.bwgjoseph</groupId>
<artifactId>maven-101-basic</artifactId>
<version>${project.version}</version>
Model Properties
If I define it under <properties> tag in the pom.xml, I can use it. This is especially useful and commonly used for defining dependency/plugin versions.
<properties>
    <java.version>17</java.version>
    <spotless.version>1.2.3</spotless.version>
</properties>

<plugin>
  <groupId>com.diffplug.spotless</groupId>
  <artifactId>spotless-maven-plugin</artifactId>
  <version>${spotless.version}</version>
</plugin>
When working with Spring Boot project, it is also quite common for us to override the dependency version in <properties> tag like
<properties>
    <java.version>17</java.version>
    <!-- Override dependency version -->
    <lombok.version>1.18.24<lombok.version>
</properties>
Since Lombok dependency is declared and managed via spring-boot-starter-parent, there is no need to re-declare the dependencies in our pom.xml except to declare to the version.
Maven Wrapper
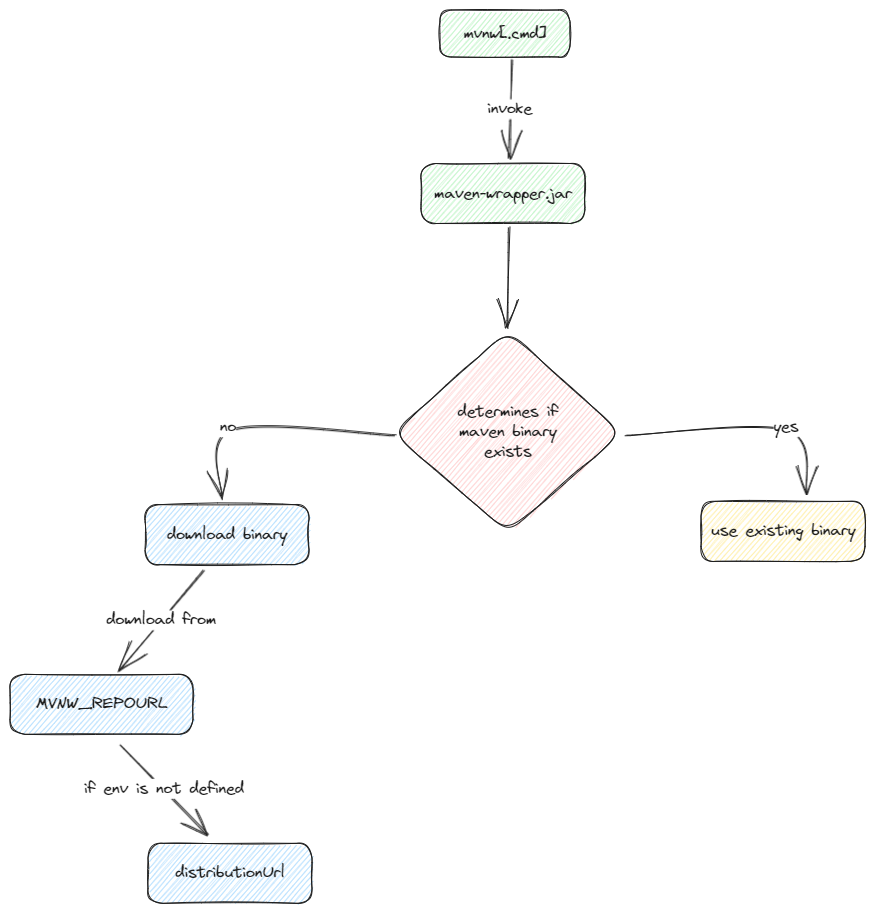
Traditionally, to run mvn command, it is required to download Maven binary, extract, define environment variable, etc. This makes the developer experience less ideal, and more involved.
Maven wrapperwas originally a 3rd party project until quite recently that it was officially released as part ofApache Maven Project
Using Maven Wrapper provides an easy way to build any Maven project without having to pre-install Maven on the machine. It has a few key components.
Maven Wrapper Jar
Maven Wrapper Jar is responsible for downloading (then installing) of Maven binary, specified in /.mvn/wrapper/maven-wrapper.properties under distributionUrl. And to invoke the targetted maven distribution whenever a command is triggered.
The maven binary will be downloaded, and extracted to %USERPROFILE%/.m2/wrapper/dists (Windows) or ~/.m2/wrapper/dists (Linux)
Maven Wrapper Distribution
Maven Wrapper Distribution provides
mvnwmvnw.cmd.mvn/wrapper/maven-wrapper.properties
When invoking mvnw[.cmd], its job is to trigger/download maven-wrapper depending on the argument passed in. However, the default is to use the wrapper in .mvn/wrapper/maven-wrapper.jar which is why in projects that have these setup, you only run commands like ./mvnw clean install.
Using Maven Wrapper Config
If you are using Maven Wrapper, then you can specify and configure the following within .mvn directory
extensions.xmlmaven.configjvm.config
This means that all these configurations are applicable per project basis. What's interesting is maven.config where you can pass in just about any maven configuration and it will be "injected" to any command you run.
The structure would be such
root/
├── .mvn/
│   ├── wrapper/
│   │   ├── maven-wrapper.jar
│   │   └── maven-wrapper.properties
│   ├── maven.config
│   ├── settings.xml
│   └── toolchains.xml
└── pom.xml
If you have custom settings per project, define them within settings.xml
<?xml version="1.0" encoding="UTF-8"?>
<settings xmlns="http://maven.apache.org/SETTINGS/1.0.0" xmlns:xsi="http://www.w3.org/2001/XMLSchema-instance"
  xsi:schemaLocation="http://maven.apache.org/SETTINGS/1.0.0 https://maven.apache.org/xsd/settings-1.0.0.xsd">
    <servers>
        <server>
            <id>internal-artifactory</id>
            <username>${env.ARTIFACTORY_USER}</username>
            <password>${env.ARTIFACTORY_PASSWORD}</password>
        </server>
    </servers>
</settings>
And in maven.config, we specify the argument
--settings="./.mvn/settings.xml"
Remember that since Maven 3.9.0, each argument starts in a new line
So when you run any maven command within the project through the wrapper, it will always append --settings="./.mvn/settings.xml" as part of the command
Others
Repositories
Define additional repositories to search for artifacts. The default repository is repo.maven.
What happens is that when you run any maven command, and it looks for dependency, it will first search locally in %USERPROFILE%\.m2 directory. If it cannot find, it will then attempt to locate it remotely via the default repository, or the additional repositories the project defines.
<project xmlns="http://maven.apache.org/POM/4.0.0" xmlns:xsi="http://www.w3.org/2001/XMLSchema-instance"
  xsi:schemaLocation="http://maven.apache.org/POM/4.0.0 https://maven.apache.org/xsd/maven-4.0.0.xsd">
  ...
  <repositories>
    <repository>
      <releases>
        <enabled>false</enabled>
        <updatePolicy>always</updatePolicy>
        <checksumPolicy>warn</checksumPolicy>
      </releases>
      <snapshots>
        <enabled>true</enabled>
        <updatePolicy>never</updatePolicy>
        <checksumPolicy>fail</checksumPolicy>
      </snapshots>
      <name>Nexus Snapshots</name>
      <id>snapshots-repo</id>
      <url>https://oss.sonatype.org/content/repositories/snapshots</url>
      <layout>default</layout>
    </repository>
  </repositories>
  <pluginRepositories>
    ...
  </pluginRepositories>
  ...
</project>
Sample pom copied from Maven
In most cases, you don't have to specify any, but some organization does have their internal repository hosted using jFrog or Nexus for various reasons.
Distribution Management
This is where we define where to distribute the project artifact during release when it is deployed.
<project xmlns="http://maven.apache.org/POM/4.0.0" xmlns:xsi="http://www.w3.org/2001/XMLSchema-instance"
  xsi:schemaLocation="http://maven.apache.org/POM/4.0.0 https://maven.apache.org/xsd/maven-4.0.0.xsd">
  ...
  <distributionManagement>
    <repository>
      <uniqueVersion>false</uniqueVersion>
      <id>corp1</id>
      <name>Corporate Repository</name>
      <url>scp://repo/maven2</url>
      <layout>default</layout>
    </repository>
    <snapshotRepository>
      <uniqueVersion>true</uniqueVersion>
      <id>propSnap</id>
      <name>Propellors Snapshots</name>
      <url>sftp://propellers.net/maven</url>
      <layout>legacy</layout>
    </snapshotRepository>
    ...
  </distributionManagement>
  ...
</project>
Sample pom copied from Maven
Settings
In other words, the configuration file for Maven. There are 3 types of settings
Global:
${maven.home}/conf/settings.xmlUser:
${user.home}/.m2/settings.xmlProject:
${project.basedir}/.mvn/settings.xml
The first two (Global and User) are the official and default ones. The last (Project) is what can be done if you are using Maven Wrapper (as mentioned above).
Toolchains
The whole idea of using Toolchains are to allow a project to be built independently from the one Maven is relying on.
It is recommended to keep it in .m2 directory but I prefer to place it into .mvn as part of the repository. This way, it removes yet another step for the developer to copy and paste. While I feel that it might be good for the project, but not quite applicable for the general public usage as a whole as every machine configuration pointing to the various JDK paths will be different, and the developer could be working with pointing to a different JDK version in JAVA_HOME
<?xml version="1.0" encoding="UTF-8"?>
<toolchains>
  <!-- JDK toolchains -->
  <toolchain>
    <type>jdk</type>
    <provides>
      <version>17</version>
    </provides>
    <configuration>
      <jdkHome>${env.JAVA_HOME}</jdkHome>
    </configuration>
  </toolchain>
</toolchains>
Profile
Using a profile is a way to pre-define some settings/configuration so it can be activated using -P command
./mvnw clean package -P default
Sometimes, the command can get a little bit long, or it is not used frequently, hence, easy to forget the actual syntax. Using Profile might be a good way to overcome this issue.
<profiles>
    <profile>
        <id>skip-test</id>
        <properties>
            <skipTests>true</skipTests>
        </properties>
    </profile>
</profiles>
The above defined a Profile with skip-test as the id, and denotes that test should be skipped when running this Profile.
So, rather than running the following
./mvnw package -DskipTests
We run the following as a replacement
./mvnw package -P skip-test
Granted, this example doesn't showcase the need to have a Profile, but if you have a more complicated setup, this is where it shines, or if you need to run different settings across different environments.
Conclusion
I hope this is a good enough introduction to Maven and I will follow up with another blog post that covers topics around multi-modules such as the different types of POM (i.e. Aggregate/Parent), using dependencyManagement, pluginManagement.
Personally, my biggest takeaway from this is on Binding plugin goal to Phase where I finally got my "that's how it works" moment as I have always been confused about how it exactly works.
Let me know if any part is confusing!
Source Code
As usual, the full source code is available on GitHub